Wednesday, June 29, 2011

thirteen


This shirt belongs to my dear, dear friend's husband. She and I met fifteen years ago (unbelievably) when we ended up in the same sophomore architecture studio. It has been my honor to get to know her over the years and watch her become an amazing woman, skilled architect, and incredible mother. We had dinner last week and she brought me this shirt to transform into a dress for her nearly three year old daughter. The colors are really beautiful with a pattern of thin lines in purples, greys and dark blue.

You know she's a true friend because when I asked her what kind of style she wanted, she told me to design the dress any way I wanted.... which says a lot considering she is a designer herself. Knowing her as I do, it was instantly clear to me that she would want a simple silhouette but with a few subtle details to make it special and unique. 

I came up with a new design which I was confident she would like, but the issue was that I had never made it before (though it is derived from dress four). When I created my pattern and it was time to cut the shirt, I got nervous. This is the most stressful part of the process for me when I am making something for someone else because I desperately do not want to make a mistake and cut the fabric incorrectly. There is only so much fabric and they have put their trust in me that I will deliver something wearable-- not a heap of ill-cut scraps! So, for this particular dress, because it means so much to me and because I didn't want to mess it up, I decided to actually make a mock-up of the dress out of one of my extra white dress shirts. 


Yes, I did. 
For those who know me, this should not be surprising. It has to be perfect. Especially if I am making it for someone else. It took extra time, but it was worth it in the end because I figured out a lot of issues that I was able to correct with the real shirt. 


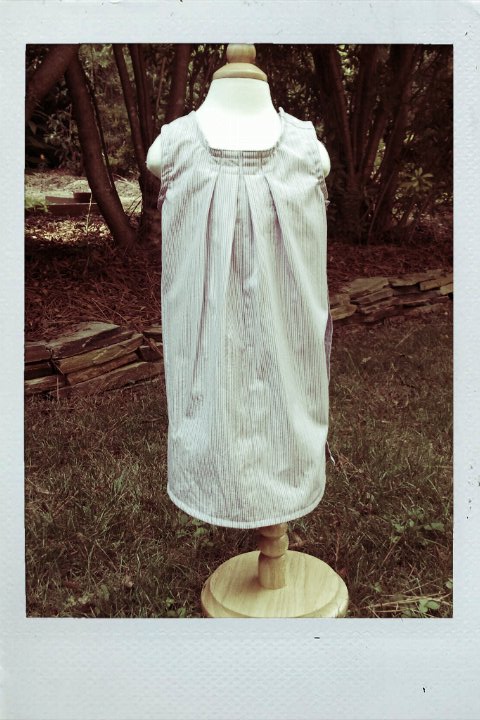
The design of the dress started with a desire to keep the button placket on the side of the dress. Additionally, unlike dress four, I wanted to use only two pattern piece for simplicity. This meant I would basically have two side pieces that would join at seams in the front and the back. I added extra width to the sides that would join in the front and kept the sides that would join at the back fitted. 


With the extra fabric that ended up at the front of the dress, I made a symmetrical knife pleat at the neckline to add shape and interest, then I top stitched four rows of a thin grey line to reinforce the pleats and give a little nod to the name of my line. 


Update: A few photos of the dress worn by its new owner!


Tuesday, June 28, 2011

clothing labels

I ordered my first batch of clothing labels today!  

The company said it will take two weeks for the production of the custom labels and I can't wait for them to arrive. They will be white satin with "little grey line" printed in grey with a center fold which means it will hang down horizontally once I sew them into the collar seam. (I could also sew them vertically into the side seam if I want the label to show on the outside.) What a difference a label will make.... this is really starting to feel professional!


Thursday, June 23, 2011

twelve

Do you know the sound a sail makes when the wind fills it up and it snaps full and tight? For some reason, the stripes on this Brooks Brothers shirt immediately got me thinking about that sound. And of sailing....


With its nautical coloring and crisp, thick fabric I had images of a breeze blowing a skirt full in profile; filling it out with air.  It belonged to my brother-in-law who, as far as I know, doesn't do a bit of sailing, but somehow the shirt, once it was removed from him, had an identity of its own.


I decided I also wanted to play with the stripes of the fabric a bit so I decided to turn them horizontal for the bodice and keep them vertical for the skirt. 


 The button placket panel was one piece of the six-panel skirt located on the side of the dress. I wanted to be able to open the dress and lay it out flat (which will be nice for ironing). In order to do this, I also placed a button on the side seam of the bodice, aligning with the skirt buttons. This was made from one of the cuffs of the shirt and I maintained its functionality so that you can adjust the sizing of the bodice just as you can make a cuff tighter or looser on your wrist. 

The straps were taken from the sleeves of the shirt maintaining the small buttons for openings at both shoulders. I decided to top stitch them onto the back of the dress as a modern nod to the sailor style.

Sunday, June 19, 2011

nine

This mens dress shirt is a beautiful blue color with nice, dark, shiny buttons. It belonged to one of my sister's friends who donated a few shirts to Little Grey Line.  I really loved the color of the fabric and wanted to use it with a coordinating plaid that I had in my stash.


My muse for this dress was my 8-month old niece, Reagan. I have been wanting to make something for her for a while now and when I saw the color of this shirt, it just seemed to be the perfect opportunity. There is no sentimental lineage to the shirt, but I'm hoping she will love it none the less. 


The original button placket from the shirt was repurposed for the back of the dress. Only the top two buttons open and when I do this design again I plan to try to have the entire back open up.


I lined the gathered skirt with the coordinating fabric then turned the bottom up as the hem to show it off a bit.  The design is fairly simple and I think my sister-in-law may have the front monogrammed (which I can't wait to see!).

Here are a few shots of my beautiful niece in her dress. 


Thursday, June 16, 2011

Granddaddy

(Editor's note: My Granddaddy, Brant Atlee Johnson, passed away yesterday, September 10, 2013. He was 93 years old and an Army Veteran of WWII where he was awarded the Silver Star. This November would have marked 64 years of marriage to my beloved Grandma. We will miss him very, very much but I am eternally thankful for his influential life.) 


It is almost impossible to put into words what this shirt means to me. It is one of sixteen (16!) short-sleeve button down shirts that my Granddaddy gave me last Thursday when my daughter and I went to visit my grandparents. He will be 92 years old this November and one drawback to his age is that he is always cold. Because of this, he no longer wears any of his short-sleeve shirts. When my Grandma took me into their closet I was flooded with images of him in these shirts. I chose this particular plaid shirt as the first of the sixteen to transform because it is quite simply him. I can see him walking in the field in this shirt. I can see him sitting in his chair in this shirt and I can see him, in this shirt, bowling with me and my sister when we were little girls.


When I began unpicking the pocket, there were little pieces of wheat and hay and lint lodged into the crevices.


For the dress, which is made for my daughter (size 2T), I wanted to experiment with a slightly different silhouette and placement of the button placket all the while keeping as much reference to the former garment as possible. 


The collar became the straps which connect to a simple bodice and gathered skirt at the front and the button placket runs down the middle of the back.


Seeing my daughter in this dress exemplifies the essence of Little Grey Line.
Each time she wears it, I think of him.

Monday, June 6, 2011

six

I was so excited to get my hands on this dress shirt.  Not only were the french cuffs lovely, but it has a light blue gingham pattern and the cotton is ultra soft. My main design goal with this transformation was to fully exploit the french cuffs and leave the rest simple and understated. 


Instead of a dress, I made a tunic to fit a girls size 5/6. The toddler dress form that I have is a 2T so you can see that it ended up a bit larger than the form, but hopefully the intention of the design is still clear.  The cuffs were redesigned for the sleeve of the tunic and because I wanted them to lay down a bit on the upper arm, I did not join them under the arm hole which will give more mobility for the wearer.  I used some buttons from my collection as stand-ins for the cuff links. 

Sunday, June 5, 2011

five

After hearing about my new venture into dressmaking, my father delivered to me- the very next day- six dress shirts to repurpose. I chose this particular shirt to work with first because it had such a cheery color palette and also because I have so many recollections of him wearing it. Even more, it still smelled like him.


I wanted to break up the large plaid pattern a bit so I decided to use the collar from the shirt as a waistband for the dress and I used two buttons from the placket as the bodice of the dress. 


The ruffle at the collar and bottom hem of the dress help soften the vertical and horizontal lines from the plaid. 


Thursday, June 2, 2011

four


I love how deceivingly simple this dress looks. The construction was actually quite complex and the design was entirely driven from the fact that I couldn't use the popular and prominent logo on the front of my brother-in-law's former dress shirt . 


If I laid out my pattern as I had done in the previous designs where the buttons are on the front of the dress, then the logo would be just within the left arm hole of the dress. Even if I wanted to keep the logo, I wouldn't have been satisfied with this location. So the challenge was to salvage and repurpose the button placket without taking the logo with it. This was a great design opportunity and lead me to relocate the button placket, as a narrow strip to the side of the shirt, and then use the original side seams for the front and back centers of the dress.  I also cut the bottom of the dress to swoop up slightly at the front and back centers to give the dress a unique shape. To facilitate ease of wear, I added a piece of the existing button placket to the left shoulder. This kept the buttons on axis and also gave the dress a bit of asymmetrical detailing.  


I am very proud of this dress because of the difficulty of construction and its conceptual design, but I think it is best appreciated in person; especially when on Adeline.


three


Clearly I was getting excited about making another dress since I was half way through cutting my pattern before I remembered to take a before photograph of the shirt. Let's just say, as you can see, that this dress shirt was just a typical non-iron (so they say), cotton shirt. Nothing fancy or remarkable about it actually. 

I thought it would be interesting to add an accent color and used the pale pink to finish the arms holes, collar and, eventually, the hem. As you can see in this photo, the boring blue dress shirt looks equally boring as a dress at this point in the design.   


The dress was in need of some embellishment and I decided to pull out some scrap fabric I had from a duvet I altered from Ikea to use as a coordinating fabric. I took the shirt fabric and the pink fabric and made a symmetrical knife pleat for the collar and folded back the end on the front to expose a bit more of the pink. 


The back of the collar is my favorite part of the dress.